Installing an SSL certificate on a GlassFish application server
- SSL Installation
- 1,819 views
- Aelswith E.

This article will guide you through the SSL installation process on a GlassFish open source application server. We used the following software and certificate for testing:
- Ubuntu server 16.04 LTS;
- GlassFish 4.1.1 downloaded from the Oracle download portal;
- PositiveSSL single-domain certificate.
To get an issued SSL certificate that can be installed on your server instance, you will need to purchase one, generate a CSR code for the domain name you would like to secure and activate the certificate. After the certificate is issued, the certificate files will be sent in the email or can be downloaded from Account Panel.
Importing the certificate files into the keystore
To perform the next steps, you will need to locate the original keystore used for the CSR code generation. You can use either PEM-encoded or PKCS#7 certificate files for importing into the keystore.
PEM
To import PEM-encoded certificates, yourdomain.crt and the corresponding CA bundle files should be used. If you received the CA bundle in a single file (e.g. yourdomain.ca-bundle), you will need to open it with a text editor and save each certificate block into a separate .crt file. You can also receive the certificate chain as 3 separate files. With a PositiveSSL certificate for this guide, our certificate chain will consist of the AddTrustExternalCARoot.crt, COMODORSAAddTrustCA.crt, COMODORSADomainValidationSecureServerCA.crt and nctest.crt files.
We will be using the â$œkeytoolâ$ utility for importing the certificates. The sequence of commands is given below:
keytool -import -trustcacerts -alias root -file AddTrustExternalCARoot.crt -keystore nctest.jks
keytool -import -trustcacerts -alias intermediate2 -file COMODORSAAddTrustCA.crt -keystore nctest.jks
keytool -import -trustcacerts -alias intermediate1 -file COMODORSADomainValidationSecureServerCA.crt -keystore nctest.jks
keytool -import -trustcacerts -alias nctest -file nctest.crt -keystore nctest.jks
NOTE: Each certificate file needs to be imported with a unique alias value and the domain certificateâ$™s alias must match the keystore alias.
PKCS#7
The certificate in PKCS#7 format is usually saved in the yourdomain.cer or yourdomain.p7b file. This type of formatting is aimed at merging the domain certificate and CA bundle into a single encoded certificate block, which is normally enclosed between —–BEGIN PKCS7—– and —–END PKCS7—– headers. Therefore, it is necessary to invoke the import command just once:
keytool -import -trustcacerts -alias nctest -file nctest.p7b -keystore nctest.jks
Importing the original keystore into the default Glassfish keystore
After the certificates are successfully imported into the keystore initially generated with the CSR code, we need to move the certificates and the corresponding private key into the Glassfish default keystore named â$œkeystore.jksâ$. In our case, it is located in the /opt/glassfish4/glassfish/domains/domain1/config directory, although the path to this file may slightly vary depending on the Glassfish installation folder and operating system.
The following keytool command should be used for importing one keystore into another:
keytool -importkeystore -srckeystore nctest.jks -destkeystore keystore.jks
If the keystores are stored in different directories, they should be specified with the relative or absolute paths (e.g., /etc/ssl/nctest.jks) in the import command.
NOTE: Since the end-point keystore password and Glassfish master password must match, make sure that you have the same passwords for the source and destination keystore. If they are different, it is possible to change the Glassfish master password with the help of the â$œchange-master-passwordâ$ subcommand specifying the source keystore password. This action will update the destination keystore password as well.
Editing http-listeners in the Glassfish Administration Console
In order to bind the newly imported certificate to a secure port on Glassfish, we need to open the corresponding http-listener settings and change the value of the Certificate NickName field to the domain certificateâ$™s alias value:
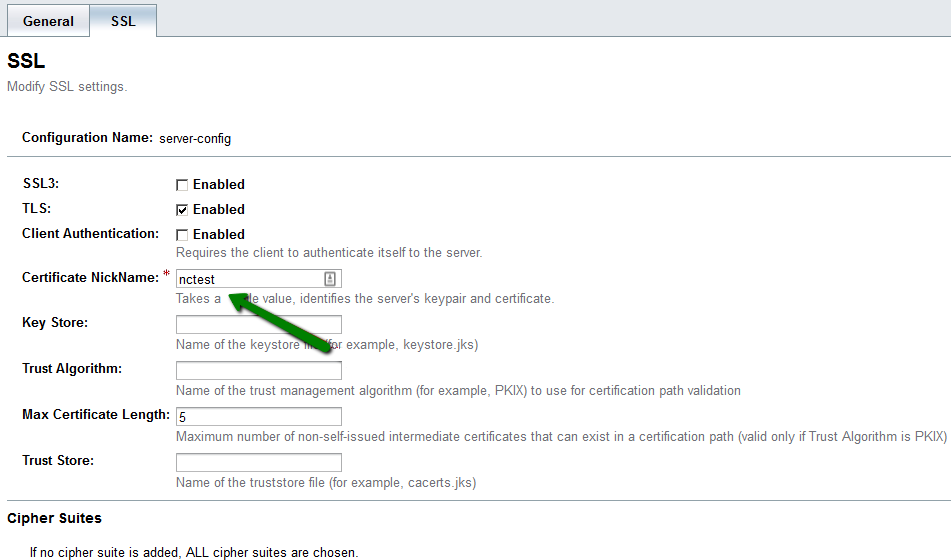
The page above can be accessed from the navigation panel on the left side of the Administration Console by following this path: Configurations >> server-config >> HTTP Service >> HTTP Listeners >> http-listener-2 >> SSL tab.
The default port for http-listener-2 is set to 8181, although it can be changed on the General tab of the same configuration page. The most commonly used port for delivering web content is 443, so feel free to use it as well, unless you need to use a custom port for your project purposes:
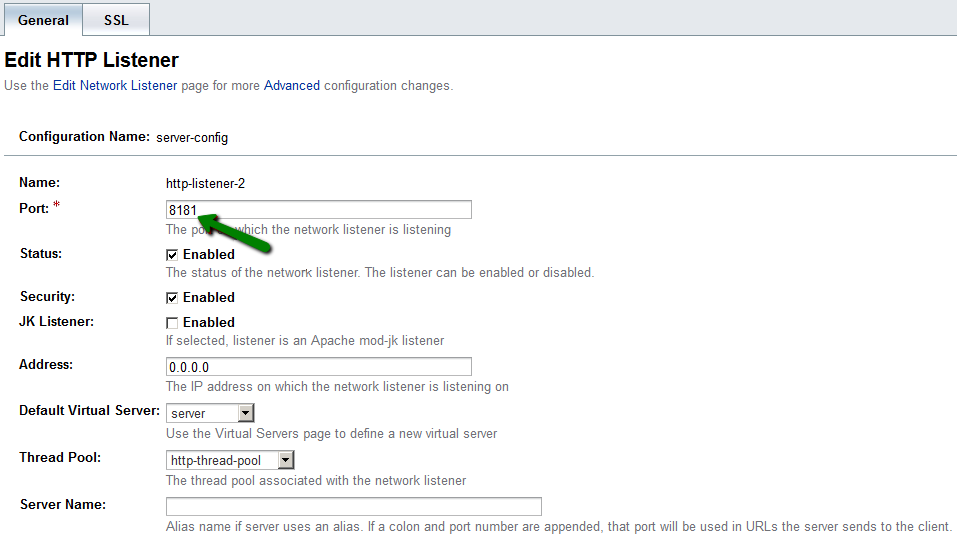
When the Certificate NickName and Port values are updated, click the Save button in the upper right corner to apply changes.
It is also possible to install the same certificate for the Glassfish Administration Console login page usually accessible on port 4848. In order to do it, just open the admin-listener configuration page located in the same section as http-listeners, go to the SSL tab and change the Certificate NickName field value to the new certificateâ$™s alias value. After that, click the Save button in the upper right corner.
Thatâ$™s it – now the certificate should be installed both for serving an application and accessing the Administration console. To check the installation, you can use this online tool. Make sure that you are entering the correct port number when checking.