How to create and maintain MySQL Databases in cPanel
- Category : MySQL Question
- Posted on : Jan 18, 2021
- Views : 1,486
- By : HostSEO

1. In order to start, log into cPanel and click on the MySQL Databases menu in the Databases section:

2. Once there, find the Create New Database section, then simply indicate name of the future database and click on the Create Database button:
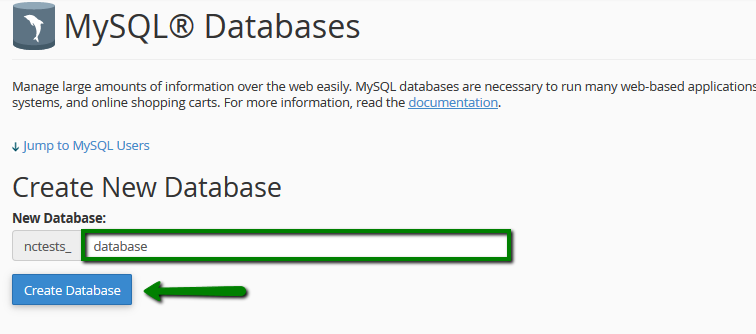
3. The database is created and ready to use. Now, in order to be able to fill and maintain the database, MySQL User should be created and assigned to the database with correct privileges.
To create a MySQL User, find the section called MySQL Users > Add New User and choose the username you wish to assign to your database. Once done, choose a secure password for MySQL User and type it into the corresponding fields:

It is highly recommended to use the built-in Password Generator to create a secure password as shown below:
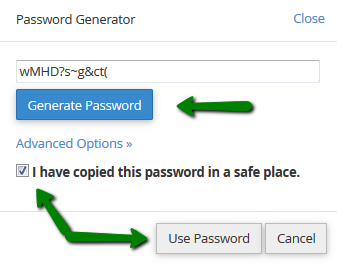
Make sure that you save the password, as you will need it to maintain the Database in the Future.
4. After the password is chosen, simply click on the Create User button to finish the process:
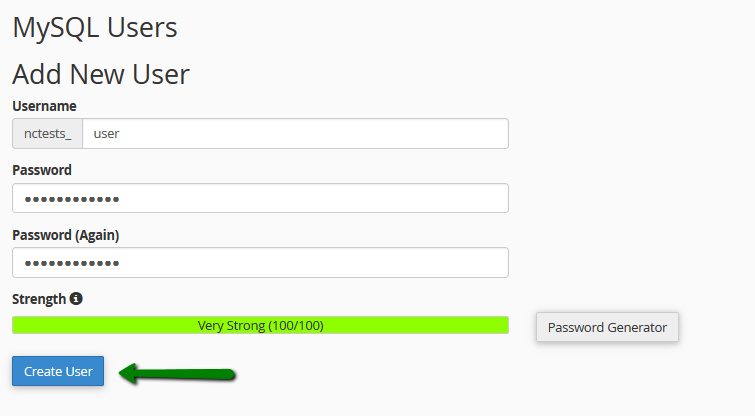
5. Now you have both MySQL Database and MySQL User created. Now we need to assign MySQL User to the database and set proper privileges. To do this, find the Add User To Database section and make sure that you choose the correct Database and User correspondingly. Once done, simply click on the Add button:

6. In the next window you will need to set correct privileges to the MySQL User. In this example, we shall grant all privileges to be able to maintain our MySQL Database without any restrictions, so you simply need to choose the All Privileges option and click on the Make Changes button:
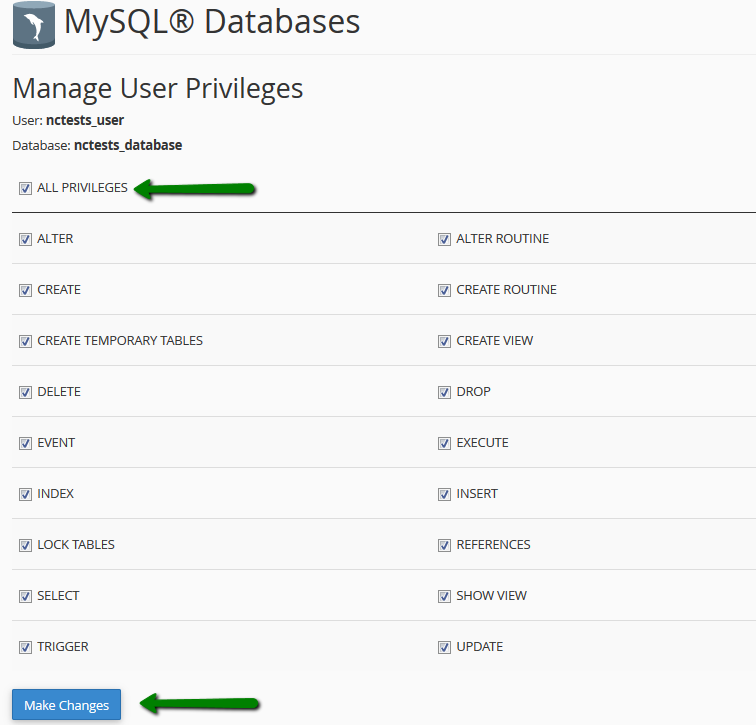
NOTE: It is important to remember that multiple MySQL Users with different sets of privileges can be assigned to the same MySQL Database.
7. Once finished, you will get the message stating that the MySQL User was successfully added to the Database:

To check this, you can simply go back to the MySQL Databases menu and check the Current Databases section:

For cPanel Retro Theme
1. In order to start, log into cPanel and click on the MySQL Databases menu in the Databases section:

2. Once there, find the Create New Database section, then simply indicate name of the future database and click on the Create Database button:

3. The database is created and ready to use. Now, in order to be able to fill and maintain the database, MySQL User should be created and assigned to the database with correct privileges. To create a MySQL User, find the section called MySQL Users > Add New User and choose the username you wish to assign to your database. Once done, choose a secure password for MySQL User and type it into the corresponding fields:
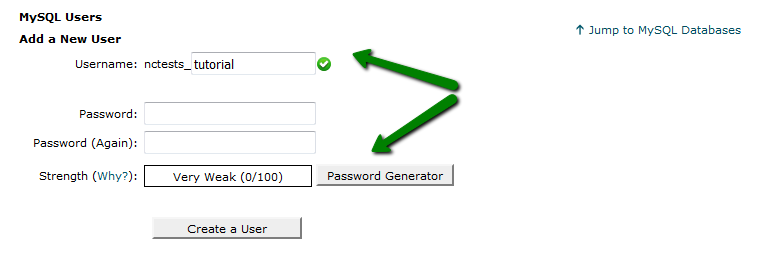
It is highly recommended to use the built-in Password Generator to create a secure password as shown below:

Make sure that you save the password, as you will need it to maintain the Database in the Future.
4. After the password is chosen, simply click on the Create User button to finish the process:

5. Now you have both MySQL Database and MySQL User created. Now we need to assign MySQL User to the database and set proper privileges. To do this, find the Add User To Database section and make sure that you choose the correct Database and User correspondingly. Once done, simply click on the Add button:

6. In the next window you will need to set correct privileges to the MySQL User. In this example, we shall grant all privileges to be able to maintain our MySQL Database without any restrictions, so you simply need to choose the All Privileges option and click on the Make Changes button:
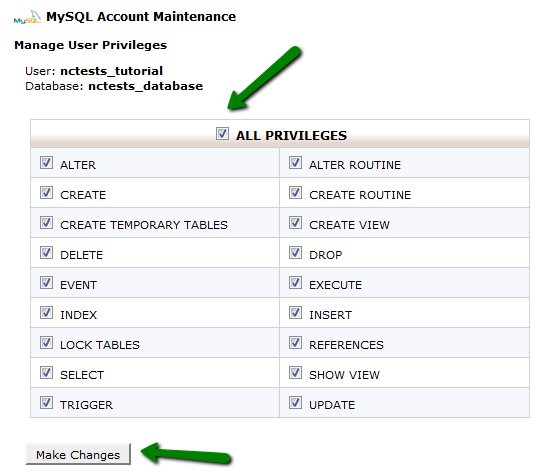
NOTE: It is important to remember that multiple MySQL Users with different sets of privileges can be assigned to the same MySQL Database.
7. Once finished, you will get the message stating that the MySQL User was successfully added to the Database:
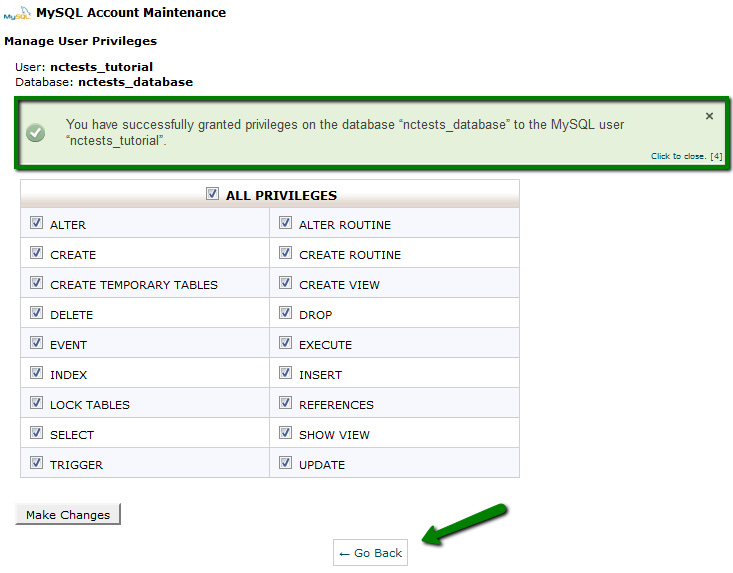
To check this, you can simply go back to the MySQL Databases menu and check the Current Databases section:

Creating a database with the MySQL Database Wizard tool
MySQL Database Wizard brings the same step-by-step process which is described above, but in a more simplified way. Letâ$™s check how it works:
1. To find the tool, log into cPanel and click on the MySQL Database Wizard option under Databases:
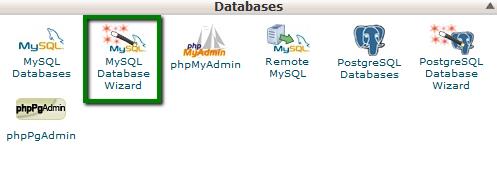
2. Once done, indicate the name of the new database and click on the Next Step button:

3. At Step 2 you will be prompted to indicate MySQL User and choose a password for it, reciprocally to the process described before:
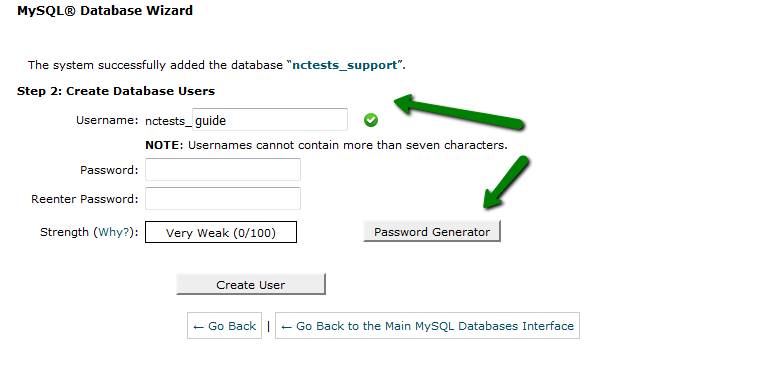
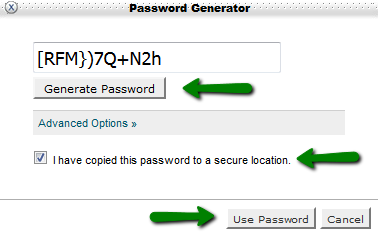
4. After the username and password are indicated, simply click on the Create User button:
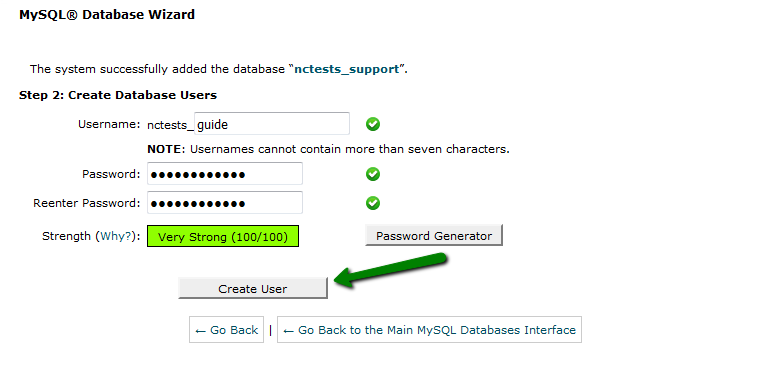
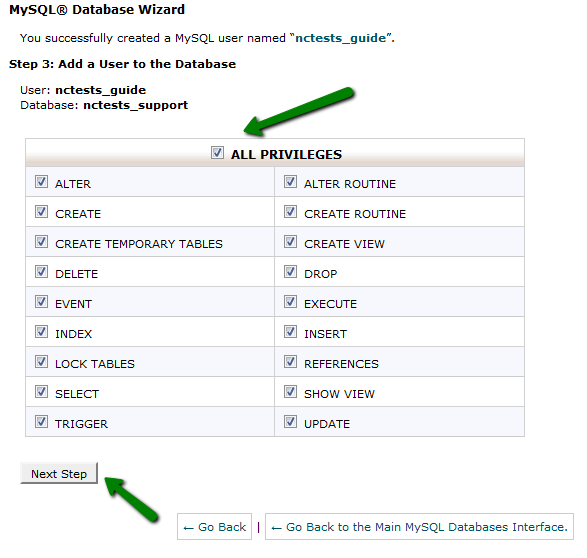
5. The next windows will allow you to set privileges for the newly created MySQL User similarly to the process described previously.
Accordingly, you will need to choose the All Privileges option and click on the Next Step button after that:
6. Once done, you will get a confirmation that the MySQL User was successfully added to the MySQL Database:

That's it!
             Â
                     Need any help? Contact our HelpDesk
Categories
- cPanel Question 47
- cPanel Software Management 29
- cPanel Tutorials 13
- Development 29
- Domain 13
- General 19
- Linux Helpline (Easy Guide) 156
- Marketing 47
- MySQL Question 13
- News 2
- PHP Configuration 14
- SEO 4
- SEO 42
- Server Administration 84
- SSL Installation 54
- Tips and Tricks 24
- VPS 3
- Web Hosting 44
- Website Security 22
- WHM questions 13
- WordPress 148
Subscribe Now
10,000 successful online businessmen like to have our content directly delivered to their inbox. Subscribe to our newsletter!Archive Calendar
| Sat | Sun | Mon | Tue | Wed | Thu | Fri |
|---|---|---|---|---|---|---|
| 1 | 2 | 3 | 4 | 5 | 6 | |
| 7 | 8 | 9 | 10 | 11 | 12 | 13 |
| 14 | 15 | 16 | 17 | 18 | 19 | 20 |
| 21 | 22 | 23 | 24 | 25 | 26 | 27 |
| 28 | ||||||
Recent Articles
-

Posted on : Sep 17
-

Posted on : Sep 10
-

Posted on : Aug 04
-

Posted on : Apr 01
Tags
- ts
- myisam
- vpn
- sql
- process
- kill
- tweak
- server load
- attack
- ddos mitigation
- Knowledge
- layer 7
- ddos
- webmail
- DMARC
- Development
- nginx
- seo vpn
- Hosting Security
- wireguard
- innodb
- exim
- smtp relay
- smtp
- VPS Hosting
- cpulimit
- Plesk
- Comparison
- cpu
- encryption
- WHM
- xampp
- sysstat
- optimize
- cheap vpn
- php-fpm
- mariadb
- apache
- Small Business
- Error
- Networking
- VPS
- SSD Hosting
- Link Building
- centos
- DNS
- optimization
- ubuntu


