How to work with scripts in Softaculous
- Category : cPanel Software Management
- Posted on : Oct 18, 2020
- Views : 1,532
- By : HostSEO


1. Install software
2. Import an installation
3. Set up auto-backups and auto-upgrades
4. Backup software
5. Restore backups
6. Upgrade software
You can install different software on your site in several clicks using the Softaculous auto-installer following this article.
If you are using one of CMS scripts available in Softaculous, but the initial installation was performed in a different way, you can import the installation to Softaculous. You need to know the name of the installed script, and then you are ready to proceed with these steps to import it:
1. Find a script you would like to import using Search or Categories in Softaculous:

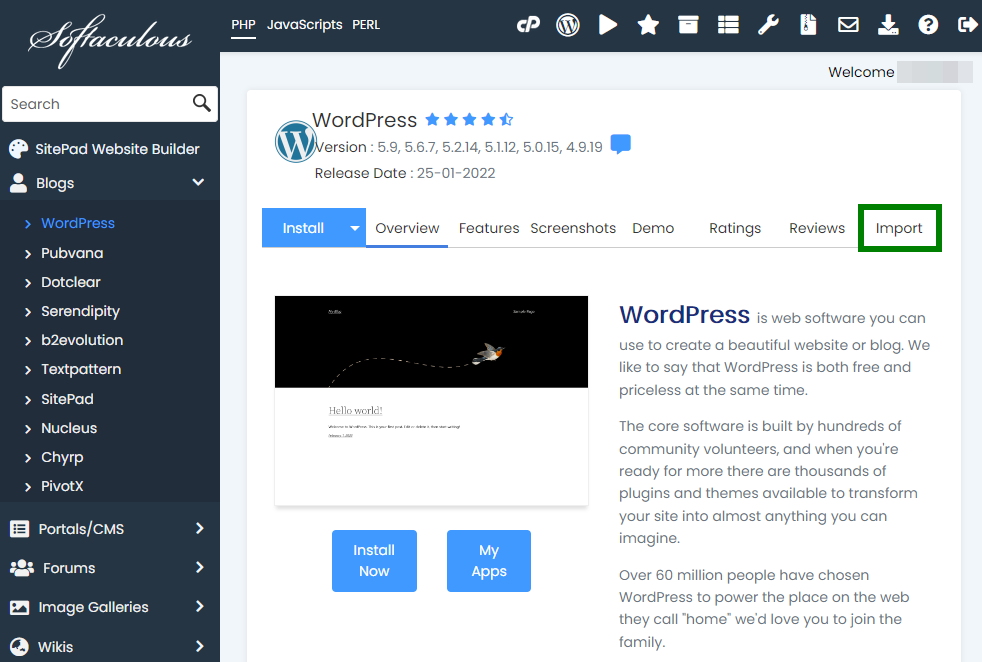
2. After you click on the name of the script you wish to import, you will see the main page of that script in Softaculous. Navigate to Import tab:
3. Select a domain name from the drop-down menu and type in a directory where the installation is currently located. In our example we have the WordPress installation in the root folder of nctest.info, so we will keep In Directory field empty. If you have an installation in the subdirectory of your domain, like in nctest.info/wordpress, you will need to type 'wordpress':
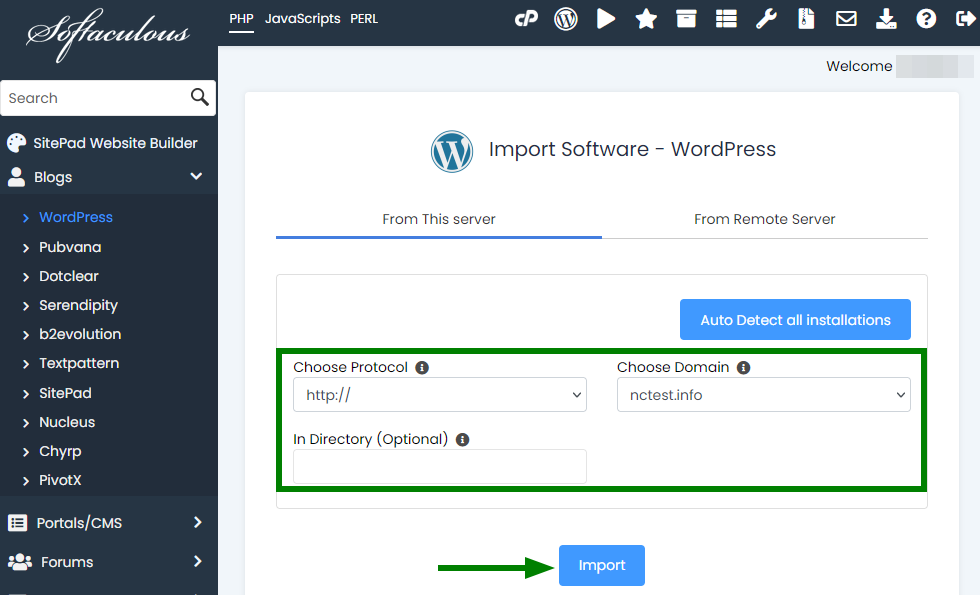
3. Click on Import button. You will see Congratulations page if everythingâ$™s done properly.
Set up auto-backups and auto-upgrades
It is possible to set up auto-backups and auto-upgrades of your script on the installation stage. However, if you forgot to do it, you can enable these options at any other moment. In order to do it, follow the steps:
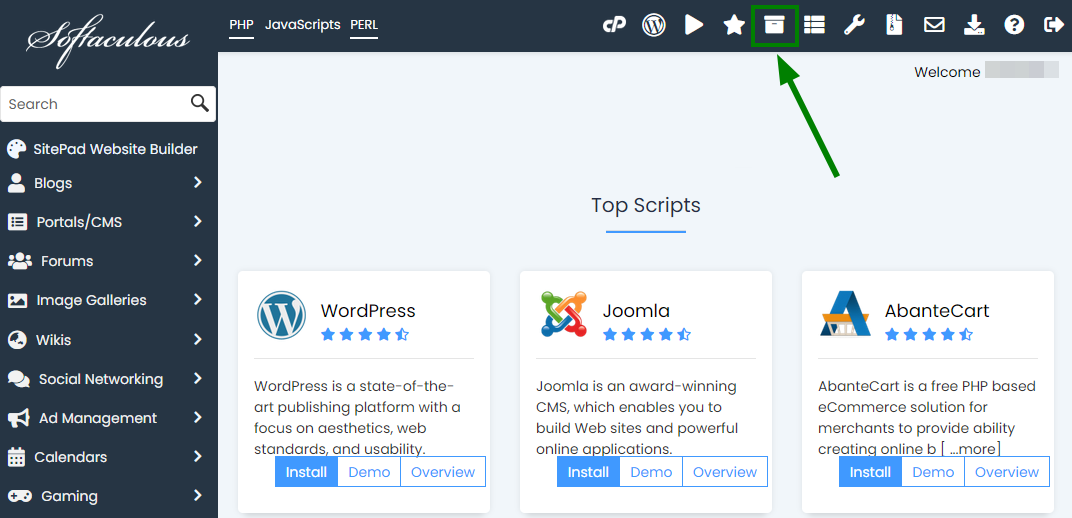
1. Open All Installations page of Softaculous:
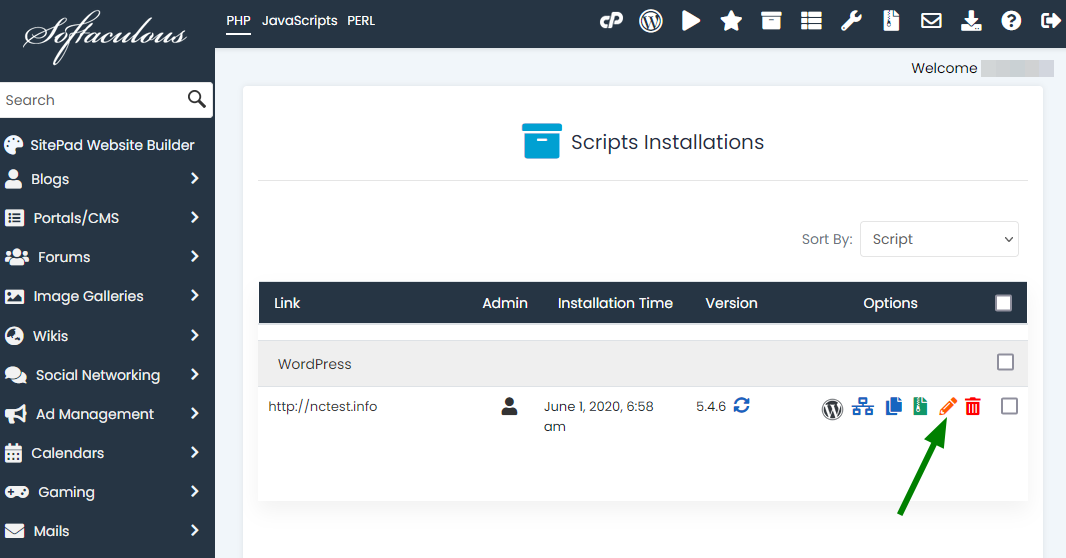
2. Locate the required installation and click on Edit icon:
3. There, you need to put checkmarks in a few checkboxes (example is shown in the screenshot below) in order to manage auto-backups and auto-upgrades of your website installation:
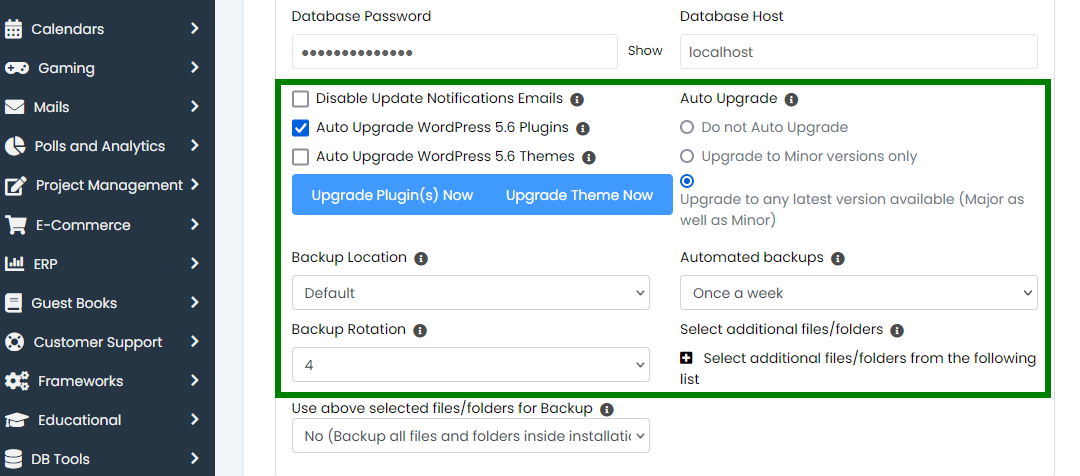
4. Click on Save Installation Details at the bottom of the page.
Make sure that you check the notes below carefully:
NOTE 1: Auto-upgrades may fail or break your website, but Softaculous always makes a backup of your installation right before performing an auto-upgrade, so you will be able to return back to a working version of your website by restoring that backup.
NOTE 2: When using the Backup Rotation option, you are allowed to set 10 automatic backup copies maximum per each script you have installed using Softaculous. Thus, when the eleventh copy of your site is generated, it will replace the earliest backup file, the first one, generated for the website installation.
NOTE 3: It is not recommended setting Backup Rotation to more than 4 copies in order not to violate Namecheap Acceptable Use Policy, which states: 'NO more than 10 GB of a shared hosting account can be allocated to any archive files'.
NOTE 4: Such backups will be stored for 28 days. Once this period is over, the backup copy will be removed from the server. Since our hosting service is not intended for storing backup files and other data not related to the website's operation itself, be advised to download backup files to your local device if you need to store them for more than 28 days.
1. Click on All Installations icon:

2. Locate the required installation and click on Backup icon:
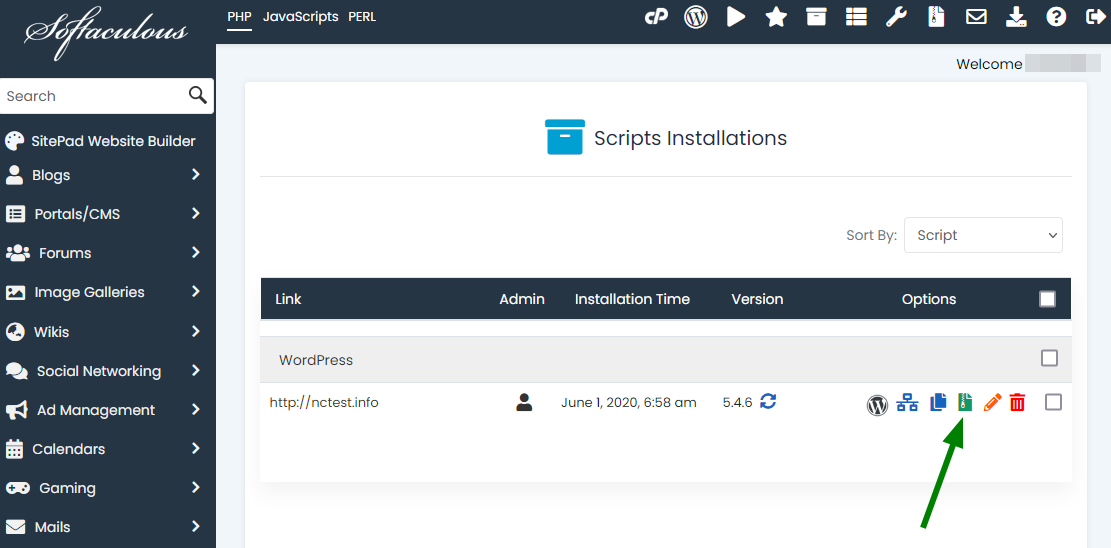
3. Choose whether you would like to back up the entire installation, database or directory with files. Also, you can add a note to your backup, choose the backup location and see some general info about your installation:
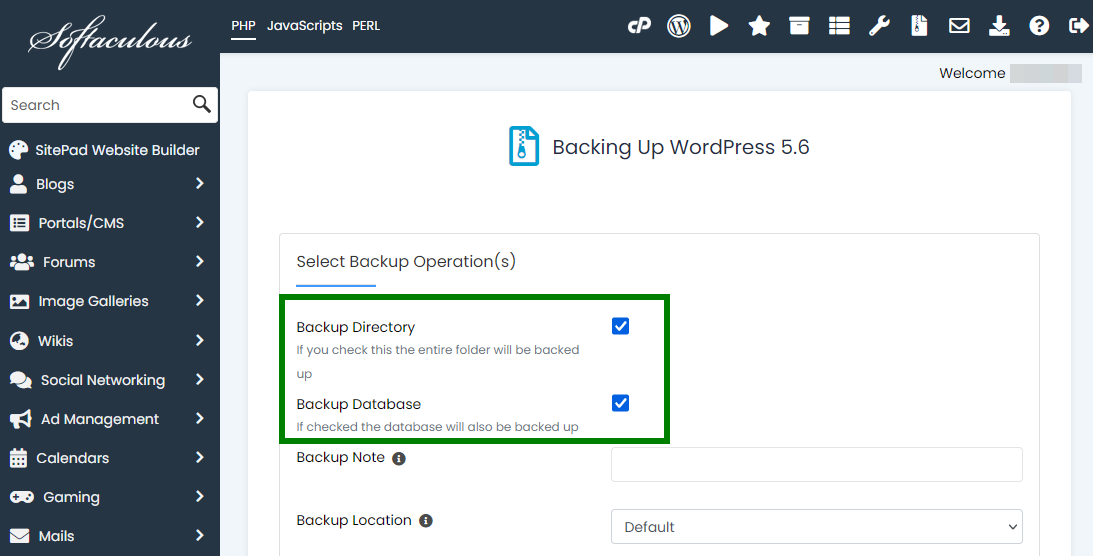
4. Click on Backup Installation at the bottom of the page to start generating the backup.
If something went wrong and your website got corrupted, you can stay calm if you have a backup. Backup restoration allows returning the website to its previous state, and you can do it following these steps:
1. Navigate to Backups and Restore section in Softaculous:
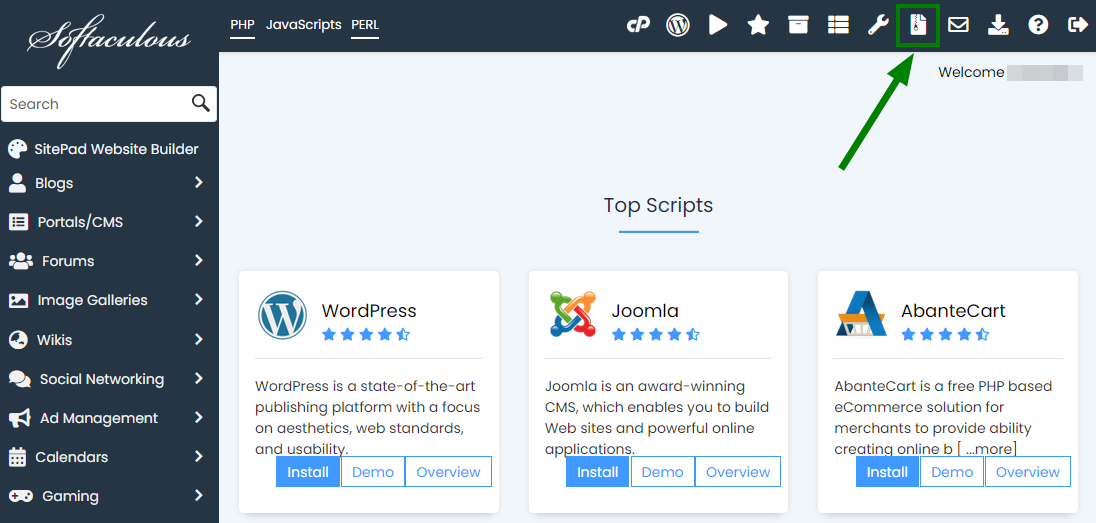
2. There, you can find all available backups of all your websitesâ$™ installations. You can choose any of those backups to restore, download or remove using appropriate icons. Also, you will be able to check notes left at the moment of the backup creation. For this, you need to mouse over the notepad icon to see them:
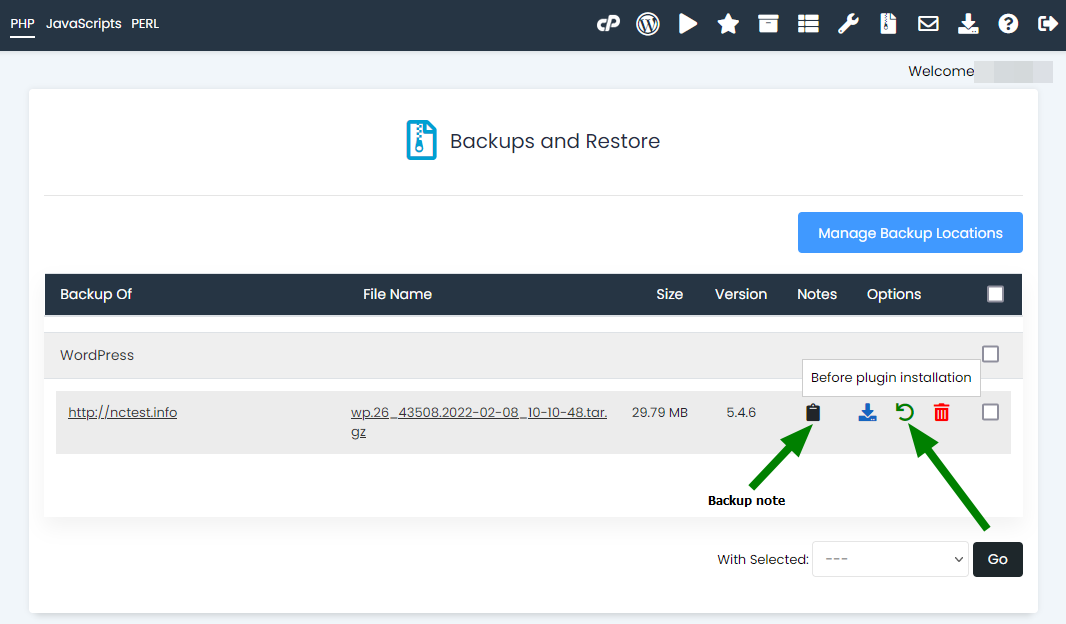
3. After you click on Restore icon, you may choose whether you would like to restore a database or directory with files or both:
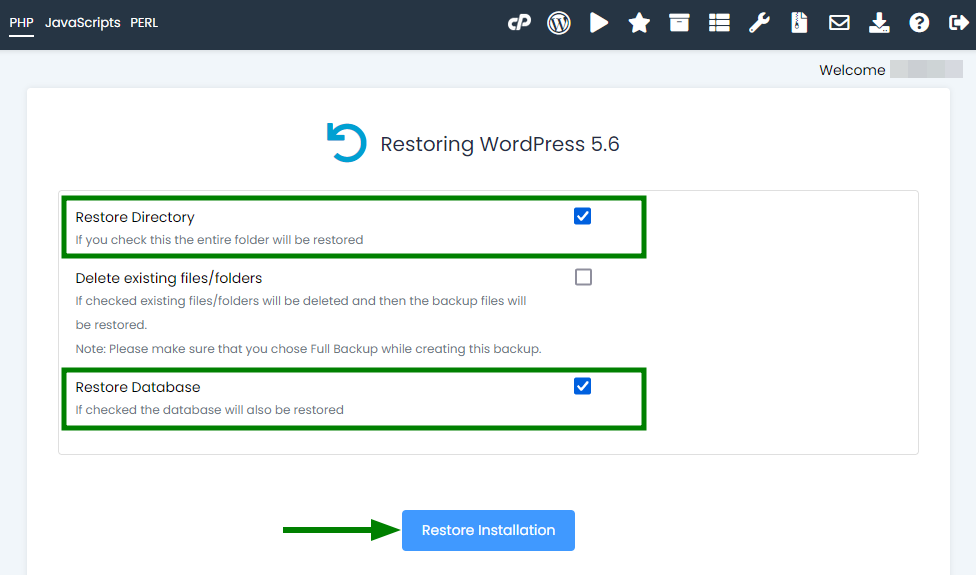
4. Once you are ready, click Restore Installation. Several minutes after your installation is returned to its previous state!
Softaculous allows upgrading software with just one click when you need it. If auto-upgrade is not set up for your installation, you can follow these simple steps to perform an upgrade:
1. Open All Installations page in Softaculous:

2. If a new version of your software is available, you will see a small Upgrade icon under Version section. Click on it:
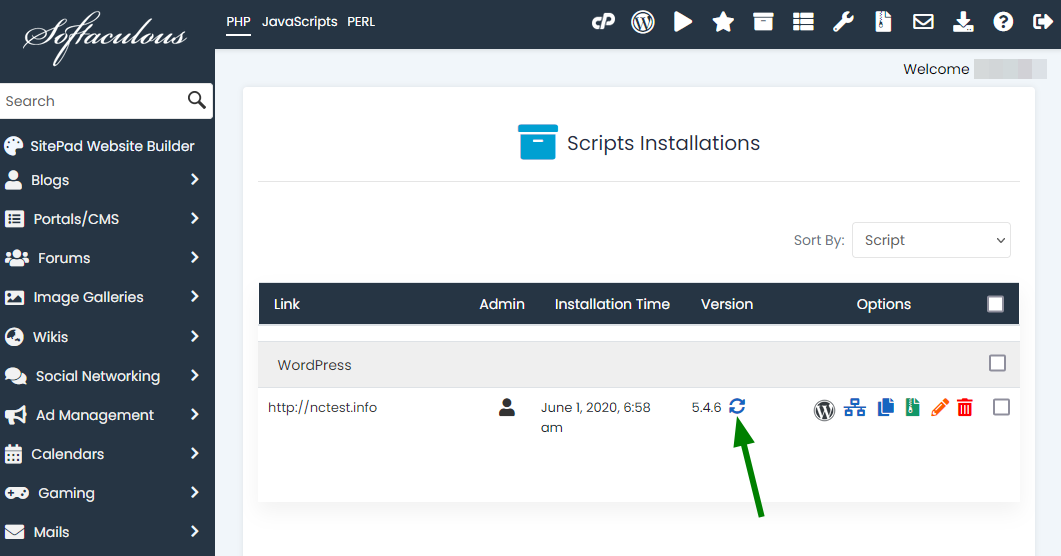
3. On the next page, it is necessary to check the box Create Backup. It is critical since such automatic upgrades may break your website.
Moreover, before performing an upgrade it is recommended to create a full backup (default option) or website's backup of your installation as shown below:
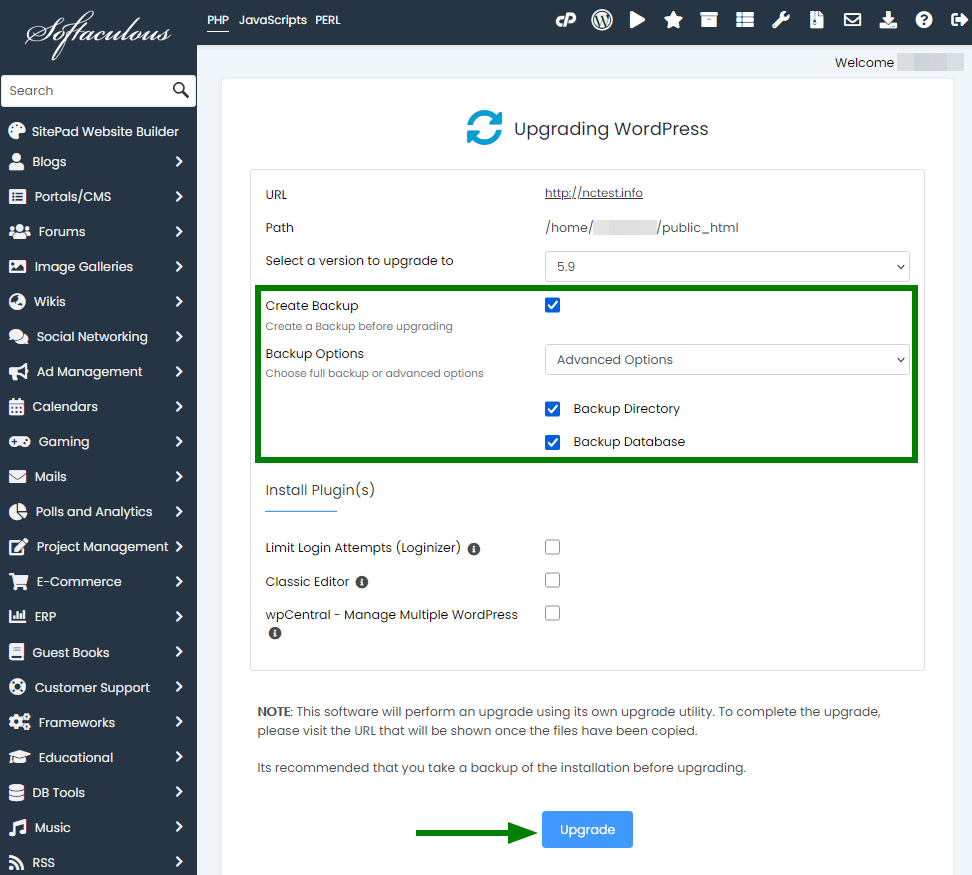
4. Then click Upgrade to start the process.
It can take a few minutes to complete the process and then you'll get Congratulations message. It is recommended to check the installation of your website to make sure the upgrade has not broken your website.
If it has broken your website, you will need to restore the backup following the instructions from the Restore backups section of this article.
If you would like to move/copy the current installation to another directory or even domain, Clone option is exactly what you need.
NOTE 1: Clone option is available for a few scripts only at the moment.
NOTE 2: It may be necessary to update some links/paths in the database of your installation after cloning. Not all of them may be re-assigned to the new domain/directory automatically
Letâ$™s say you have mistakenly installed WordPress to the /wp subfolder instead of the root folder of your domain. In this case, you will need to do the following:
1. Open All Installations page of Softaculous:

2. Click on Clone button:

3. On the next screen, you will see information about the current installation you are cloning. Also, you will need to specify a domain name where you are trying to clone your installation, choose In Directory field and set some other options (e.g., disable Search Engine visibility or choose another Site Name):
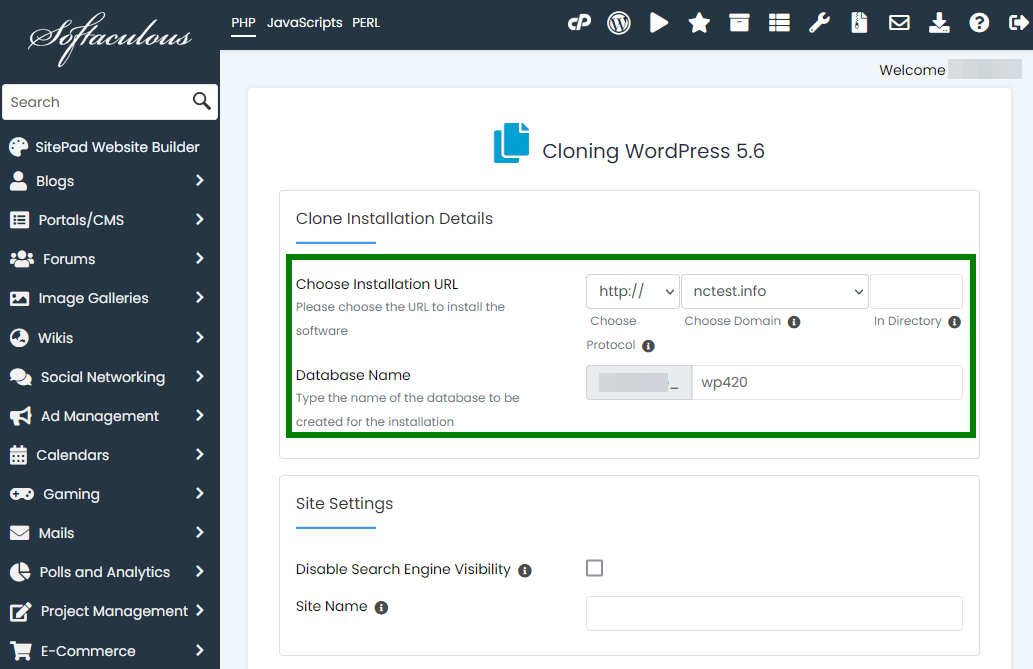
NOTE: In Directory field should be empty if you would like to clone the installation to the root directory of your domain.
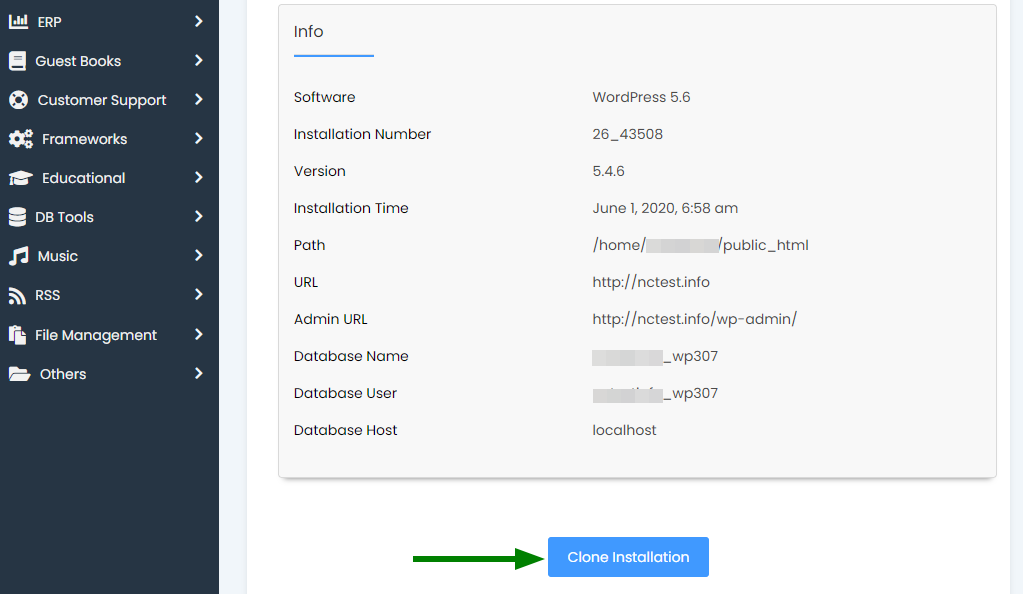
As the name suggests, the Create Staging option allows for the testing of upgrades and/or other changes before pushing it to live installation.
1. First, open the All Installations page to see your current websiteâ$™s installations. See below:

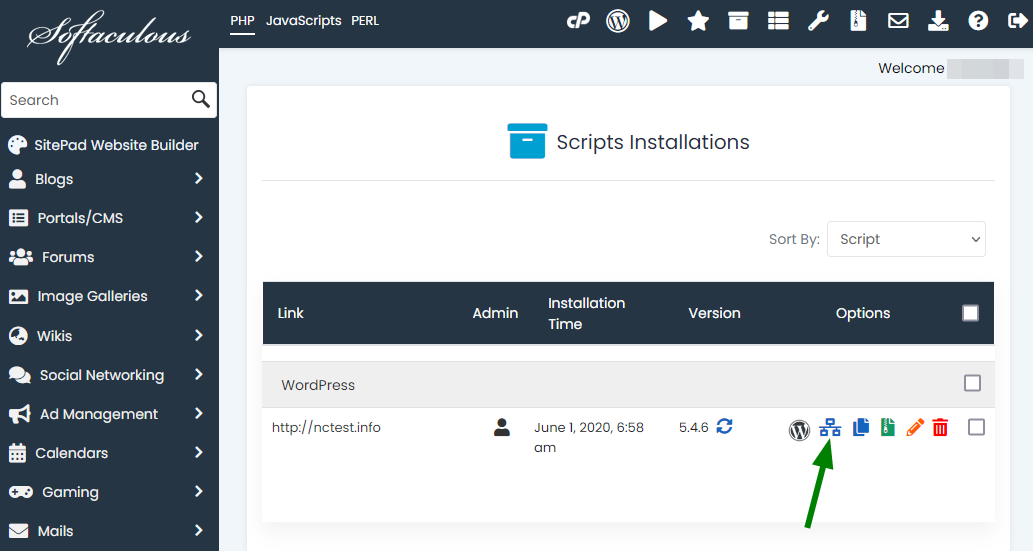
- The protocol
- The domain name in question
- The directory you wish to set for installation
- The database name

5. On the next page you will see the website URL and the respective link to that websiteâ$™s dashboard.
PLEASE NOTE: The admin/user account login details will be the same as the ones you used for source installation.
Â
6. As soon as your staging installation is ready, you can now select Push to Live.
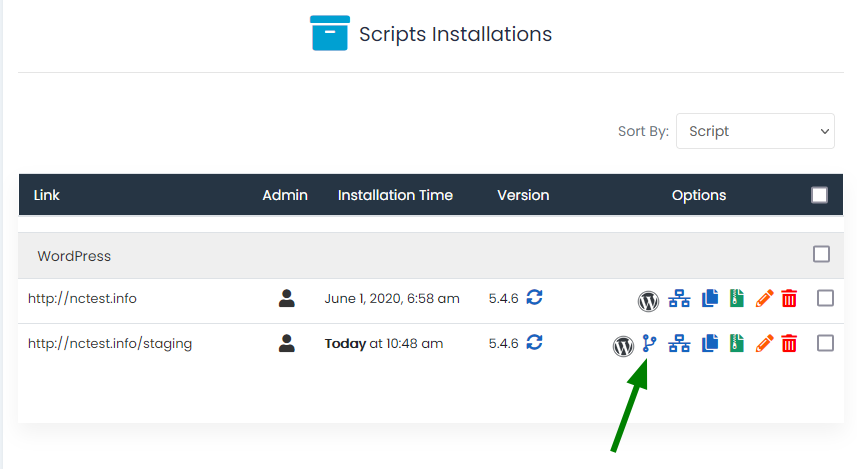
7. On the next page you will see two ways to push installation:
- By default
- By customization
With the Custom Push you will be given the opportunity to select those files, databases, table structures, and table data you would like to push.
8. Once youâ$™ve selected your chosen way, click on the Push to Live button. Depending on the size of your installation, the time it takes to go live will vary.
Deleting an installation is an easy process as well thanks to Softaculous:
1. Open All Installations page to see your current website installations:

2. Find the installation you would like to remove and click on the red button:

3. On the next screen, you will see general information about the installation you are removing and will be able to choose whether all data of this installation should be removed or not:
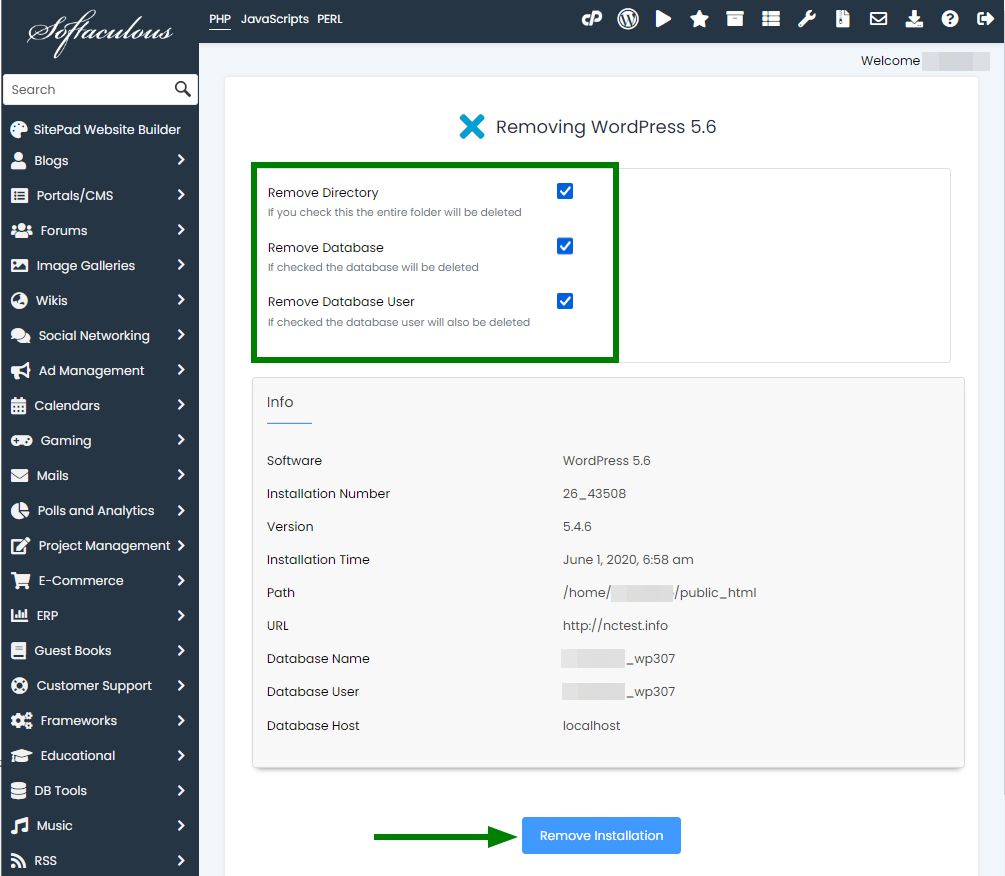
4. Click on Remove Installation button.
That's it!
                  Need any help? Contact our HelpDesk
Categories
- cPanel Question 47
- cPanel Software Management 29
- cPanel Tutorials 13
- Development 29
- Domain 13
- General 19
- Linux Helpline (Easy Guide) 156
- Marketing 47
- MySQL Question 13
- News 2
- PHP Configuration 14
- SEO 4
- SEO 42
- Server Administration 84
- SSL Installation 54
- Tips and Tricks 24
- VPS 3
- Web Hosting 44
- Website Security 22
- WHM questions 13
- WordPress 148
Subscribe Now
10,000 successful online businessmen like to have our content directly delivered to their inbox. Subscribe to our newsletter!Archive Calendar
| Sat | Sun | Mon | Tue | Wed | Thu | Fri |
|---|---|---|---|---|---|---|
| 1 | 2 | 3 | 4 | 5 | 6 | |
| 7 | 8 | 9 | 10 | 11 | 12 | 13 |
| 14 | 15 | 16 | 17 | 18 | 19 | 20 |
| 21 | 22 | 23 | 24 | 25 | 26 | 27 |
| 28 | ||||||
Recent Articles
-

Posted on : Sep 17
-

Posted on : Sep 10
-

Posted on : Aug 04
-

Posted on : Apr 01
Tags
- ts
- myisam
- vpn
- sql
- process
- kill
- tweak
- server load
- attack
- ddos mitigation
- Knowledge
- layer 7
- ddos
- webmail
- DMARC
- Development
- nginx
- seo vpn
- Hosting Security
- wireguard
- innodb
- exim
- smtp relay
- smtp
- VPS Hosting
- cpulimit
- Plesk
- Comparison
- cpu
- encryption
- WHM
- xampp
- sysstat
- optimize
- cheap vpn
- php-fpm
- mariadb
- apache
- Small Business
- Error
- Networking
- VPS
- SSD Hosting
- Link Building
- centos
- DNS
- optimization
- ubuntu


