How to work with Python App
- Category : cPanel Software Management
- Posted on : Apr 18, 2020
- Views : 1,718
- By : HostSEO

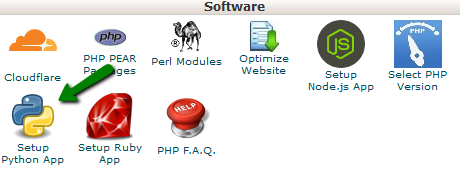
The Setup Python App feature allows you to deploy Python applications on your cPanel while running the Apache web server.
You can check the functionality by visiting the cPanel >> Setup Python App.
For cPanel Basic Theme:


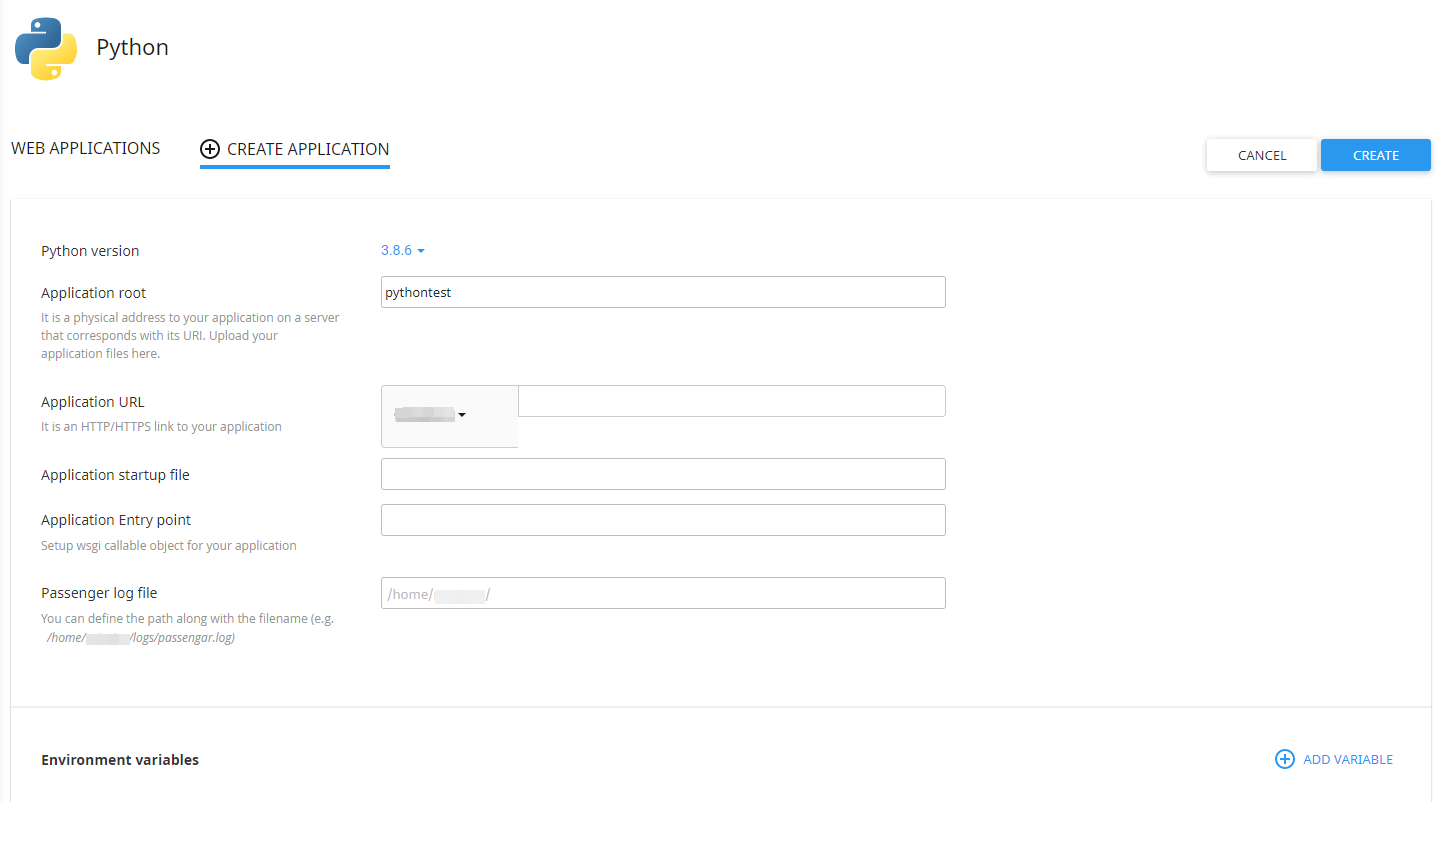
If you wish to create a new Python application, you must specify the Python version, fill in the Application root, and the Application URL. Then click Create.
Optionally, you can also set up Application startup file, Application Entry point and Passenger log file.
As soon as the environment is set, you can upload your application files to the application root directory.
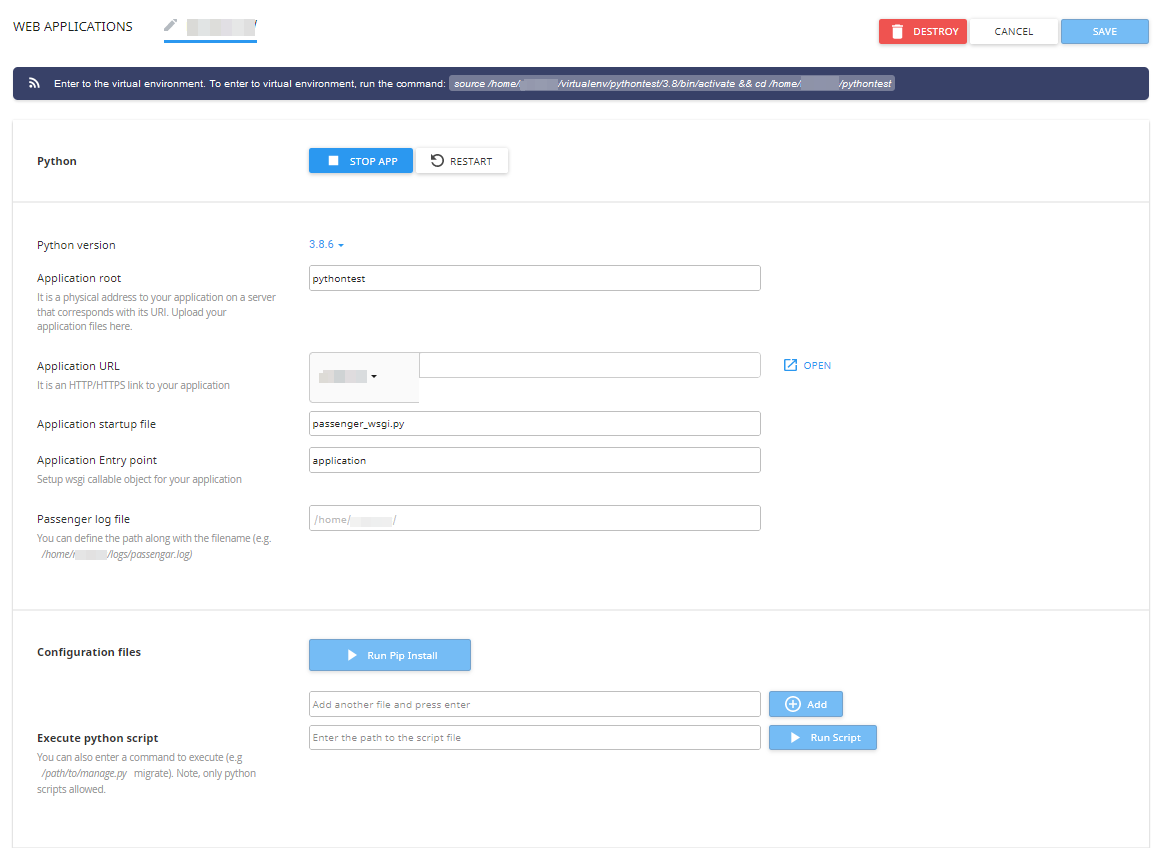
When the application is created, you will be able to see the next page:

NOTE: To be able to do this, you need to enable Shell access as in this guide.
You can change options like Python version, Application root, Application URL, Application startup file, Application Entry point and Passenger log file here.
After changing such options, please make sure to click the Save button on the upper right.
The Python versions available are 2.7 and 3.3, 3.4, 3.5, 3.6, 3.7, 3.8 and 3.9.
PLEASE NOTE: Python version switch can take up to 5 minutes.
The Application startup file is to specify the Python WSGI application entry point. It must be specified as a filename.
Application Entry point is there to set up a WSGI callable object for the previously specified startup file.
With the help of the Configuration files field you can install various modules through Pip. Under the Add another fileâ$¦ field you can enter the name of the given module and click Add.

Once you have added the module, you can click Run Pip Install and install the module in question from the drop-down.
NOTE: You can also execute pip install commands directly under the virtual environment via SSH.
Also, you can execute python script commands from the web interface (e.g. you can install packages from specific repositories or control web applications by means of django-admin).


Click Add Variable and you will be able to set up Name and Value of the variable in question. After you have entered the correct data, click Done to create the variable.
NOTE: Changes will not be applied to the application environment until the Update button is clicked. All changes can be reverted by clicking the Reset button.
To delete the application, click Destroy. The application folder itself will remain unmoved.

In some cases, apps may not run properly when the main application variable is called app. This is because WSGI software that we use to run Python on our servers requires the main application variable to be called application.
We will use the Flask application as an example here to make the application work:
1. Install Flask and all the other modules required for the app. It can be done in many ways:
- Install modules manually one by one over SSH
- Install all the modules at a time with a requirements.txt file.
- Install all the modules with a setup.py file via SSH, if it is created for the application,. The usage of this option depends on the app in question.
3. Find the main script of the application in the application root folder. Search for the following line to find it:
from app import app
(it can be from src import app or from app import application, however from app import app is the most common way to write it). The main script is usually called app.py, main.py, index.py, or init.py.
4. Rename this script to passenger_wsgi.py or set it in the Application startup file field within the Python App interface in cPanel.
5. Right below the import line (from app import app), insert this line:
application = app
The described actions should help fix an application that was not written with WSGI software in mind.
Categories
- cPanel Question 47
- cPanel Software Management 29
- cPanel Tutorials 13
- Development 29
- Domain 13
- General 19
- Linux Helpline (Easy Guide) 156
- Marketing 47
- MySQL Question 13
- News 2
- PHP Configuration 14
- SEO 4
- SEO 42
- Server Administration 84
- SSL Installation 54
- Tips and Tricks 24
- VPS 3
- Web Hosting 44
- Website Security 22
- WHM questions 13
- WordPress 148
Subscribe Now
10,000 successful online businessmen like to have our content directly delivered to their inbox. Subscribe to our newsletter!Archive Calendar
| Sat | Sun | Mon | Tue | Wed | Thu | Fri |
|---|---|---|---|---|---|---|
| 1 | 2 | 3 | 4 | 5 | 6 | |
| 7 | 8 | 9 | 10 | 11 | 12 | 13 |
| 14 | 15 | 16 | 17 | 18 | 19 | 20 |
| 21 | 22 | 23 | 24 | 25 | 26 | 27 |
| 28 | ||||||
Recent Articles
-

Posted on : Sep 17
-

Posted on : Sep 10
-

Posted on : Aug 04
-

Posted on : Apr 01
Tags
- ts
- myisam
- vpn
- sql
- process
- kill
- tweak
- server load
- attack
- ddos mitigation
- Knowledge
- layer 7
- ddos
- webmail
- DMARC
- Development
- nginx
- seo vpn
- Hosting Security
- wireguard
- innodb
- exim
- smtp relay
- smtp
- VPS Hosting
- cpulimit
- Plesk
- Comparison
- cpu
- encryption
- WHM
- xampp
- sysstat
- optimize
- cheap vpn
- php-fpm
- mariadb
- apache
- Small Business
- Error
- Networking
- VPS
- SSD Hosting
- Link Building
- centos
- DNS
- optimization
- ubuntu


