How to use TCP traceroute
- Category : Tips and Tricks
- Posted on : May 19, 2020
- Views : 1,397
- By : HostSEO

Unlike the more traditional traceroute which sends either UDP or ICMP ECHO packets, TCP Traceroute is using TCP packets and, thus, can bypass the most common firewall filters.
Follow the instructions below in order to run TCP Traceroute:
For Windows users
Windows does not have a native utility to run TCP traceroute. To run it on Windows, you will need to install the Npcap library and download the tracetcp utility.
To install the Npcap library, follow these steps:
1. Download the Npcap library.
2. Double-click on the downloaded executable file open it and start installation.
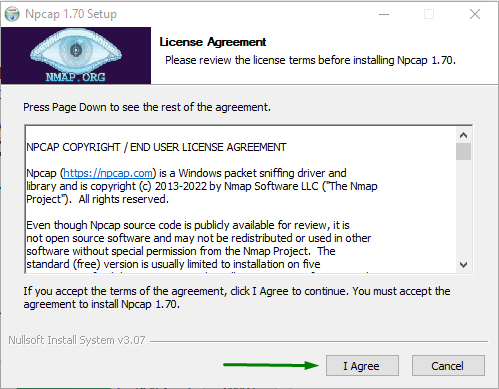
3. Review the License agreement and click the I Agree button:
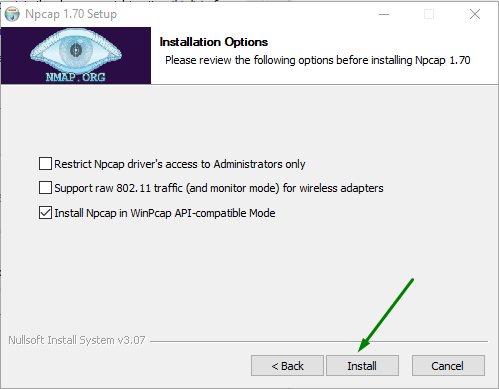
4. On the next page click the Install button:
The next step is to download tracetcp.
Once the archive is downloaded, extract the files from the .zip archive and move them to the C:\Windows\System32\ folder:

IMPORTANT: By default, the TCP traceroute can be run only if the working directory was changed via CMD to the folder where the traceTCP executable is located (i.e. C:\Windows\System32\tracetcp_directory).
In order to be able to run it from anywhere in the system, it is required to add the path of the traceTCP executable to the system environment variables.
For this, go to the Start menu >> Edit System Environment Variables >> Environment Variables >> select "Path" variable and click on "Edit" >> click on "New" >> paste the path to the traceTCP folder in its name:
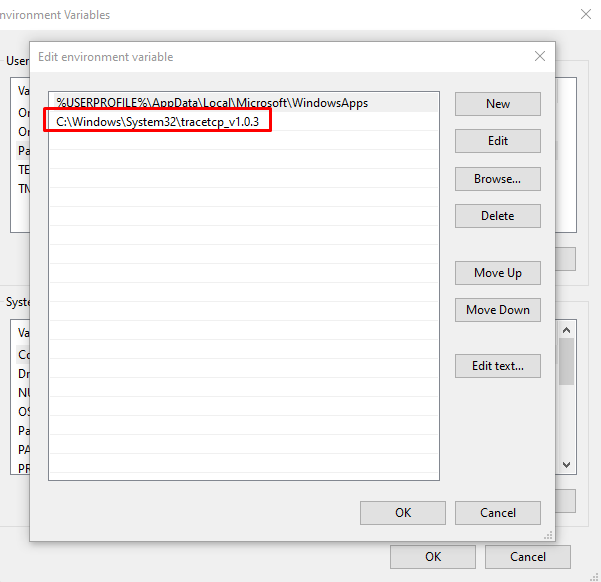
Then press "OK".
Now you can run TCP traceroute in the following way:
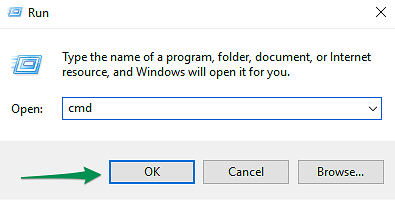
1. To open the Command Prompt (CMD), press Win + R keymatch. Run dialog box will be opened.
2. Type cmd and click on the OK button:
3. Type the command:
tracetcp domainname.tld
NOTE: domainname.tld should be replaced with your domain name, a serverâ$™s name or its IP address.
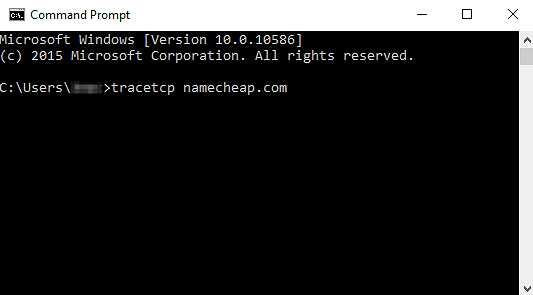
4. Press Enter.
For Mac users
You can install TCP Traceroute app in the following way:
1. Press command+space keymatch >> type Terminal >> press enter/return key.
2. Type in Terminal the following command:
ruby -e "$(curl -fsSL https://raw.githubusercontent.com/Homebrew/install/master/install)" < /dev/null 2> /dev/null
and press enter/return key. Wait for it to finish.
brew install tcptraceroute
sudo tcptraceroute domainname.tld

NOTE 1: domainname.tld should be replaced with your domain name, a serverâ$™s name or its IP address.
NOTE 2: when executing this command, you will be prompted to enter the password for the administrator account you are currently logged in as.
traceroute -T domainname.tld
NOTE: domainname.tld should be replaced with your domain name, a serverâ$™s name or its IP address.
That's it!
             Â
                     Need any help? Contact our HelpDesk
Categories
- cPanel Question 47
- cPanel Software Management 29
- cPanel Tutorials 13
- Development 29
- Domain 13
- General 19
- Linux Helpline (Easy Guide) 156
- Marketing 47
- MySQL Question 13
- News 2
- PHP Configuration 14
- SEO 4
- SEO 42
- Server Administration 84
- SSL Installation 54
- Tips and Tricks 24
- VPS 3
- Web Hosting 44
- Website Security 22
- WHM questions 13
- WordPress 148
Subscribe Now
10,000 successful online businessmen like to have our content directly delivered to their inbox. Subscribe to our newsletter!Archive Calendar
| Sat | Sun | Mon | Tue | Wed | Thu | Fri |
|---|---|---|---|---|---|---|
| 1 | 2 | 3 | 4 | 5 | 6 | |
| 7 | 8 | 9 | 10 | 11 | 12 | 13 |
| 14 | 15 | 16 | 17 | 18 | 19 | 20 |
| 21 | 22 | 23 | 24 | 25 | 26 | 27 |
| 28 | ||||||
Recent Articles
-

Posted on : Sep 17
-

Posted on : Sep 10
-

Posted on : Aug 04
-

Posted on : Apr 01
Tags
- ts
- myisam
- vpn
- sql
- process
- kill
- tweak
- server load
- attack
- ddos mitigation
- Knowledge
- layer 7
- ddos
- webmail
- DMARC
- Development
- nginx
- seo vpn
- Hosting Security
- wireguard
- innodb
- exim
- smtp relay
- smtp
- VPS Hosting
- cpulimit
- Plesk
- Comparison
- cpu
- encryption
- WHM
- xampp
- sysstat
- optimize
- cheap vpn
- php-fpm
- mariadb
- apache
- Small Business
- Error
- Networking
- VPS
- SSD Hosting
- Link Building
- centos
- DNS
- optimization
- ubuntu


